
Organized Art Supply Storage
When you make as much art and as many crafts as I do, having a perfectly organized art supply storage is a must. To be honest, there is truly nothing worse than looking for supplies and not being able to find them. Also, a pet peeve of mine is not having easy access to all materials. In our last apartment, my supplies were in a long hallway and though there was plenty of space, there was just truly not enough for what I needed and I could not access it all. Most of it was out but a lot of it lived in plastic bins under my desk to help keep organized. Because most of it was not accessible I often forgot about it or did not use it as much and that was often because I did not have it out all the time where I could see it and easily access it. I knew that when we moved I really wanted my art supply storage to be something that changed. I wanted them to be on display at all times, almost like decorations! I wanted to be able to access anything I wanted and needed at all times and to hopefully have some organization through the process.
I started by doing a TON of research. I was constantly on Instagram or Pinterest trying to figure out what to do and what fun way to display every supply. There were a lot of people whose supply storage that I saw that was very much just focused on one type of art, but as a painter turned weaver and DIY connoisseur, I have a lot more supplies than I probably need and so I needed to get creative with how I was going to display this storage.
My first idea was to get an IVAR cabinet from Ikea with a fold down table. I was honestly thrilled by it. I was so excited to have a table and to be able to hide the art supplies while also having them available and also having a table! I was very jazzed about this cabinet system and told everyone I was going to get it. Then COVID-19 happened and Ikea stopped shipping most items, so the IVAR cabinet became a no.
I went back to the drawing board of Instagram and Pinterest. I saw that Erin Barrett of Sunwoven had very cool open shelves full of yarn, trimming and books. I messaged her about it and she told me she had built it. It looked very similar to IVAR shelves which I already knew I liked, so then I looked into building them as well (we see now where the building furniture obsession began). It turned out that I did not have the resources to build my own art supply storage, but I did start looking into shelves. I then came across Rebecca of Nook of the North and took a glance at her studio storage. She had a basic black shelf with a pegboard above it. I LOVED this idea! Vertical storage and also a place to show my own work/ hang more supplies, I was completely in and could not wait to figure out how I was going to make this happen. Rebecca also did not have a “art table” it looked like she just had a space in her dining room to work (it could easily be in her studio but it seemed like it worked for my vision if it was her dining room)
I was then scrolling around on Pinterest and came across this post called “Miriam’s Studio” and was just completely blown away. The space was so multi-functional and multipurpose. Multiple people in her family used this space and it was also FILLED with art supplies. She had this amazing wall circle for storage and a whole lot of other wall storage for her pens and other supplies. I liked both of these so much that I decided to make it all myself and recreate these spaces in my own space.
CREATING THE SPACE
I knew that I wanted this space to be amazing, but I also did not want to spend too much money on it. Granted it was probably going to be one of the most used spaces in the home, I still felt like I needed to save as much as I could. I think in total this whole project cost me $75.00 and it was because some of the stuff I already had handy.
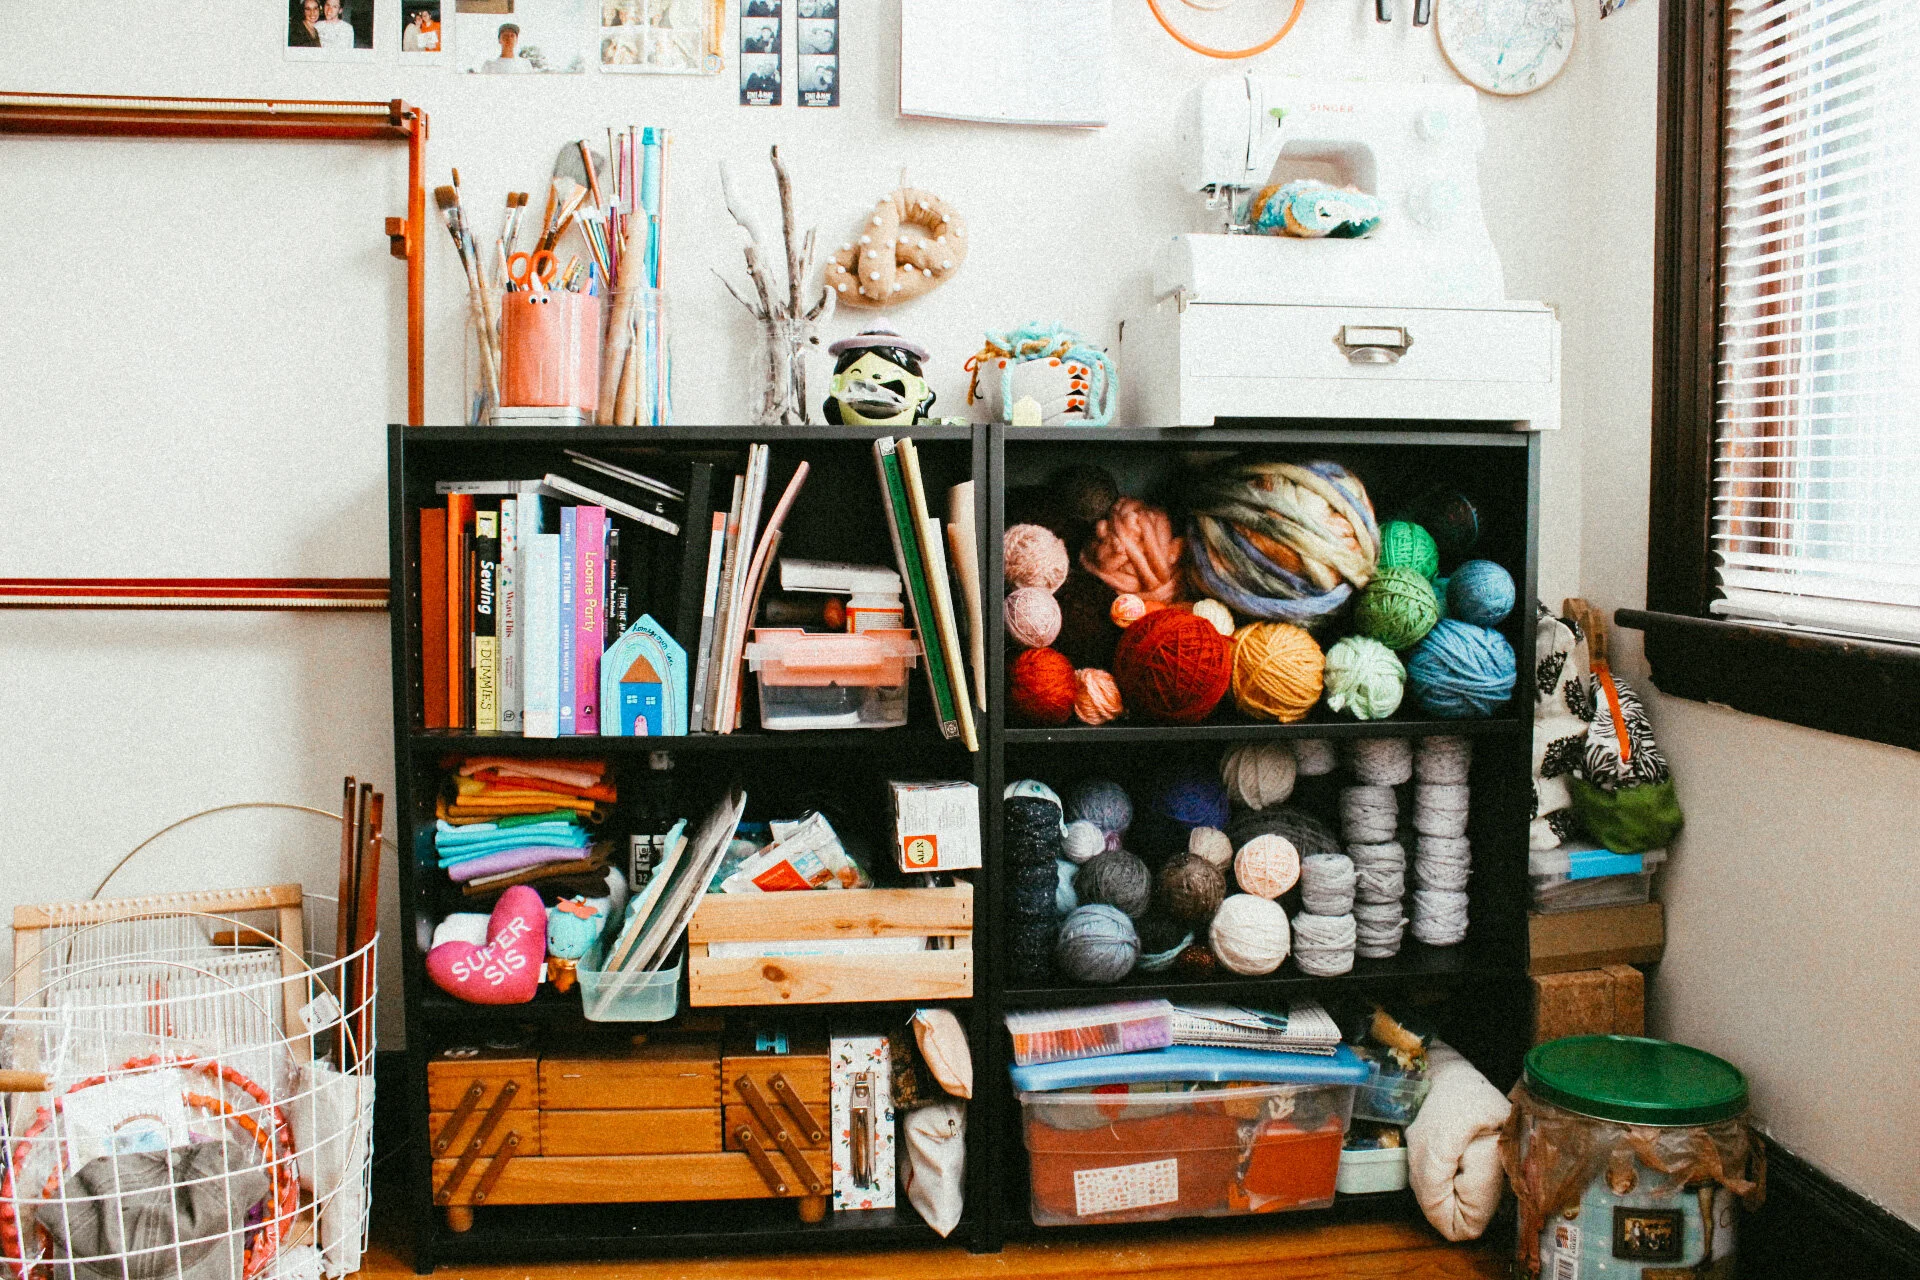
I wanted to start with the shelves to make sure that I had shelves that were big but not too tall and had a lot of space. I wanted them to be like a table top so that things could fit on top of them but also to be open. I ended up just going to Google and looking up bookshelves. To my surprise, there were very cheap, only $25.00 bookshelves from Target that were exactly what I was looking for. They were perfectly high and wide enough to fit two in the space. I ended up purchasing two and getting order pick up so I did not have to pay for shipping (WOO!) Putting them together was literally a breeze, and the shelves are adjustable in height so I was able to pick what height I wanted the shelves to be!

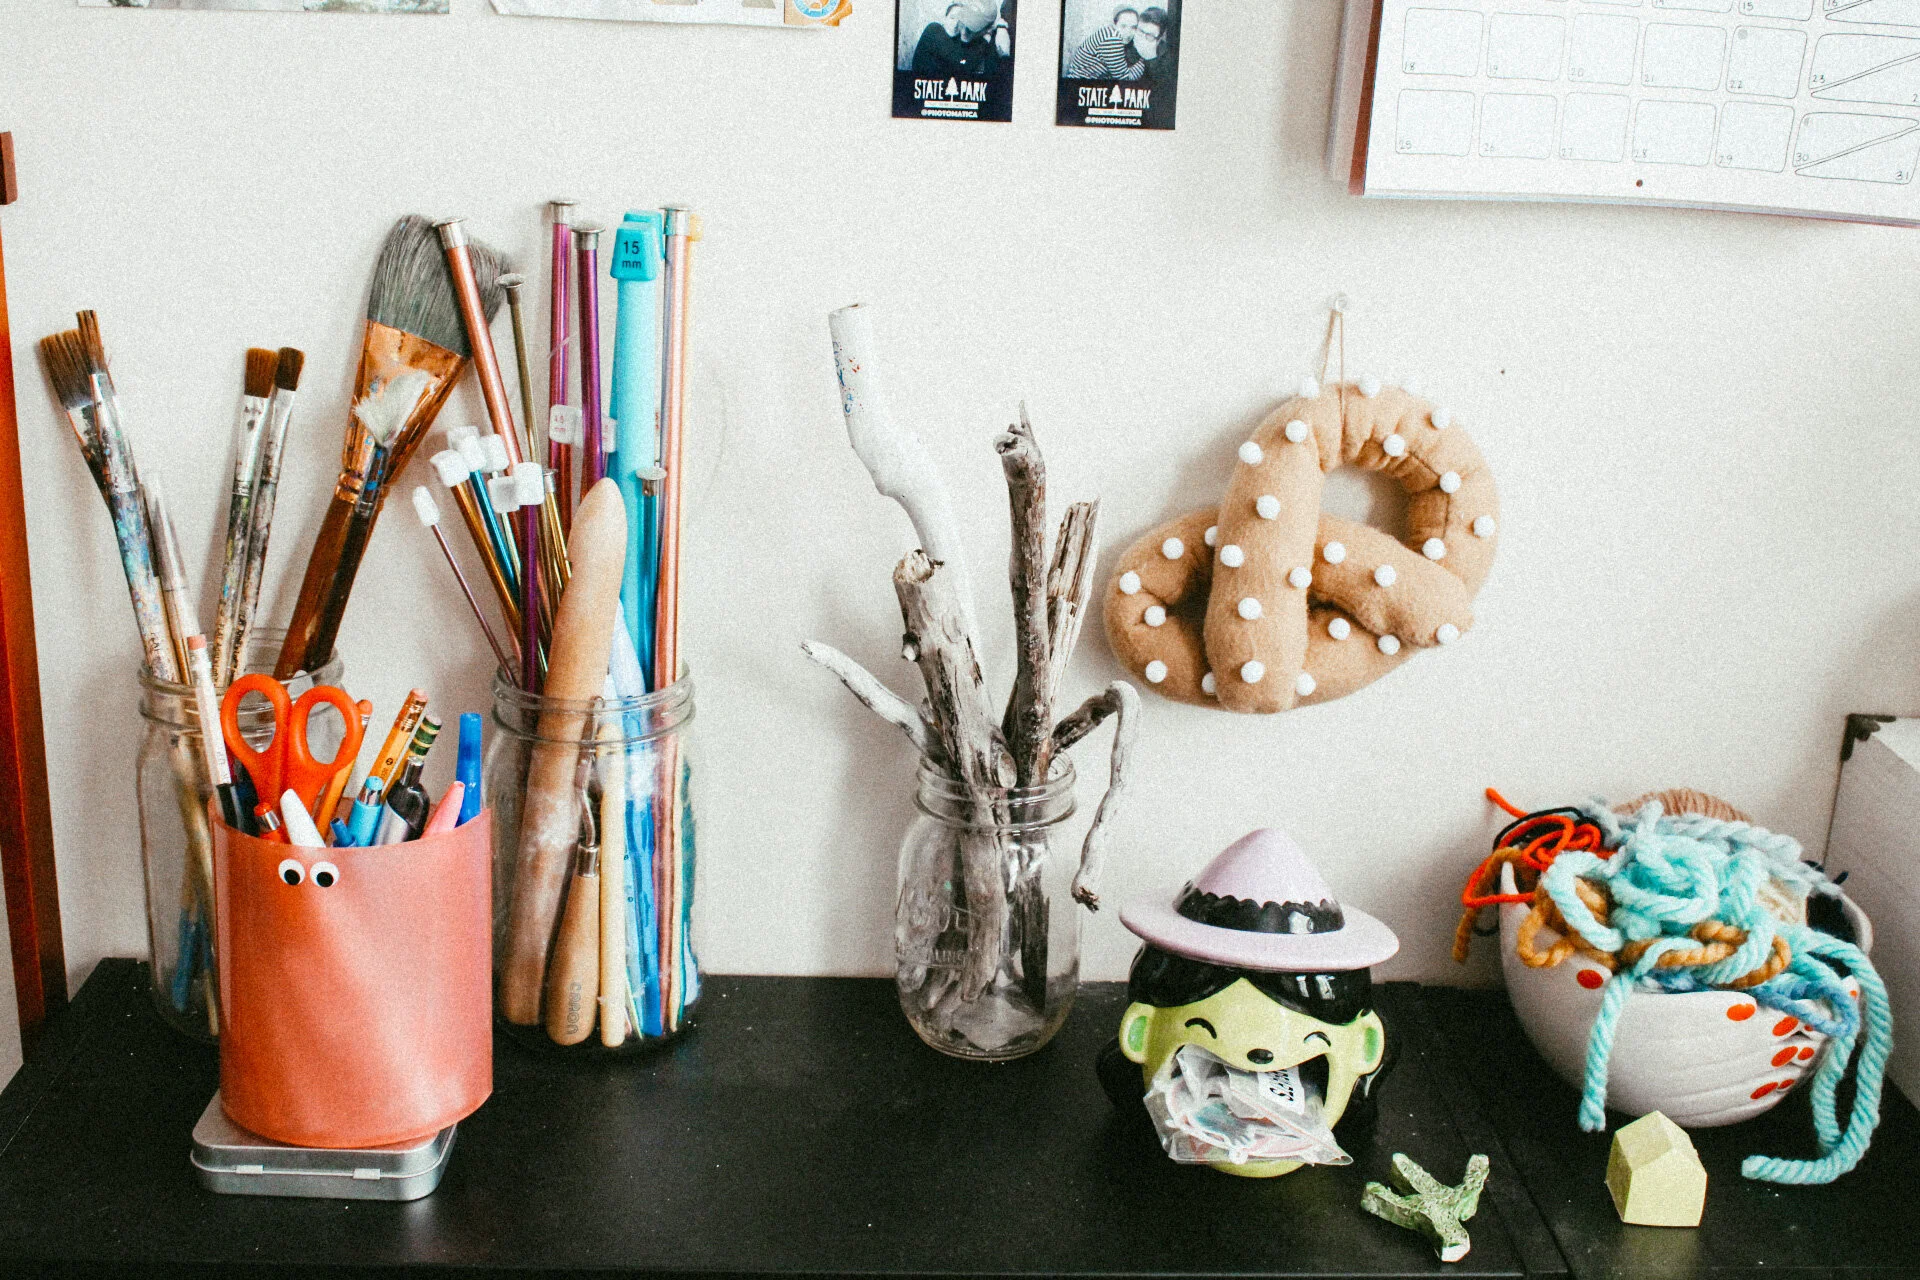
The decorating was a bit of a challenge because I did not know where I wanted to put things. I ended up having 1 bookshelf for books, sketchbooks, paper, and some other crafts where as the other bookshelf was mainly being used for yarn and fabric. I tried to keep everything as color coordinated as possible and that was really quite helpful. There is a part of me that feels like it is a lot shown on the shelves, and I thought about having doors, but I will make them if I ever want to change it. For now it seems right. On top I also added some things. I placed the sewing machine, some scrap yarn and some materials like brushes, weaving sticks, pens and crochet hooks. All in all these shelves hold a lot of stuff and I am so happy with them.
MAKING THE PEGBOARD
Thanks to my inspiration, I knew that I did not just want, I needed to create a pegboard. In a non pandemic, I would have just gone out and bought one and spray painted it the color I wanted. I saw that they had them at Home Depot, but it just was not speaking to me in the way that the idea I had to make one was. So I set out on an adventure to make my own pegboard out of pegboard weaving looms by Martha Stewart that I had 9 of from a weaving group I ran two years ago.
I started by spray painting them all green, the color that I used was called Hunt Club Green from Rustoleum 2X spray paint. It was super easy and the color was exactly what I wanted. My original plan was to hang each of the pegboard looms individually, but with some trying and completely failing, I decided it would be best to connect it as one large board and hang it that way.
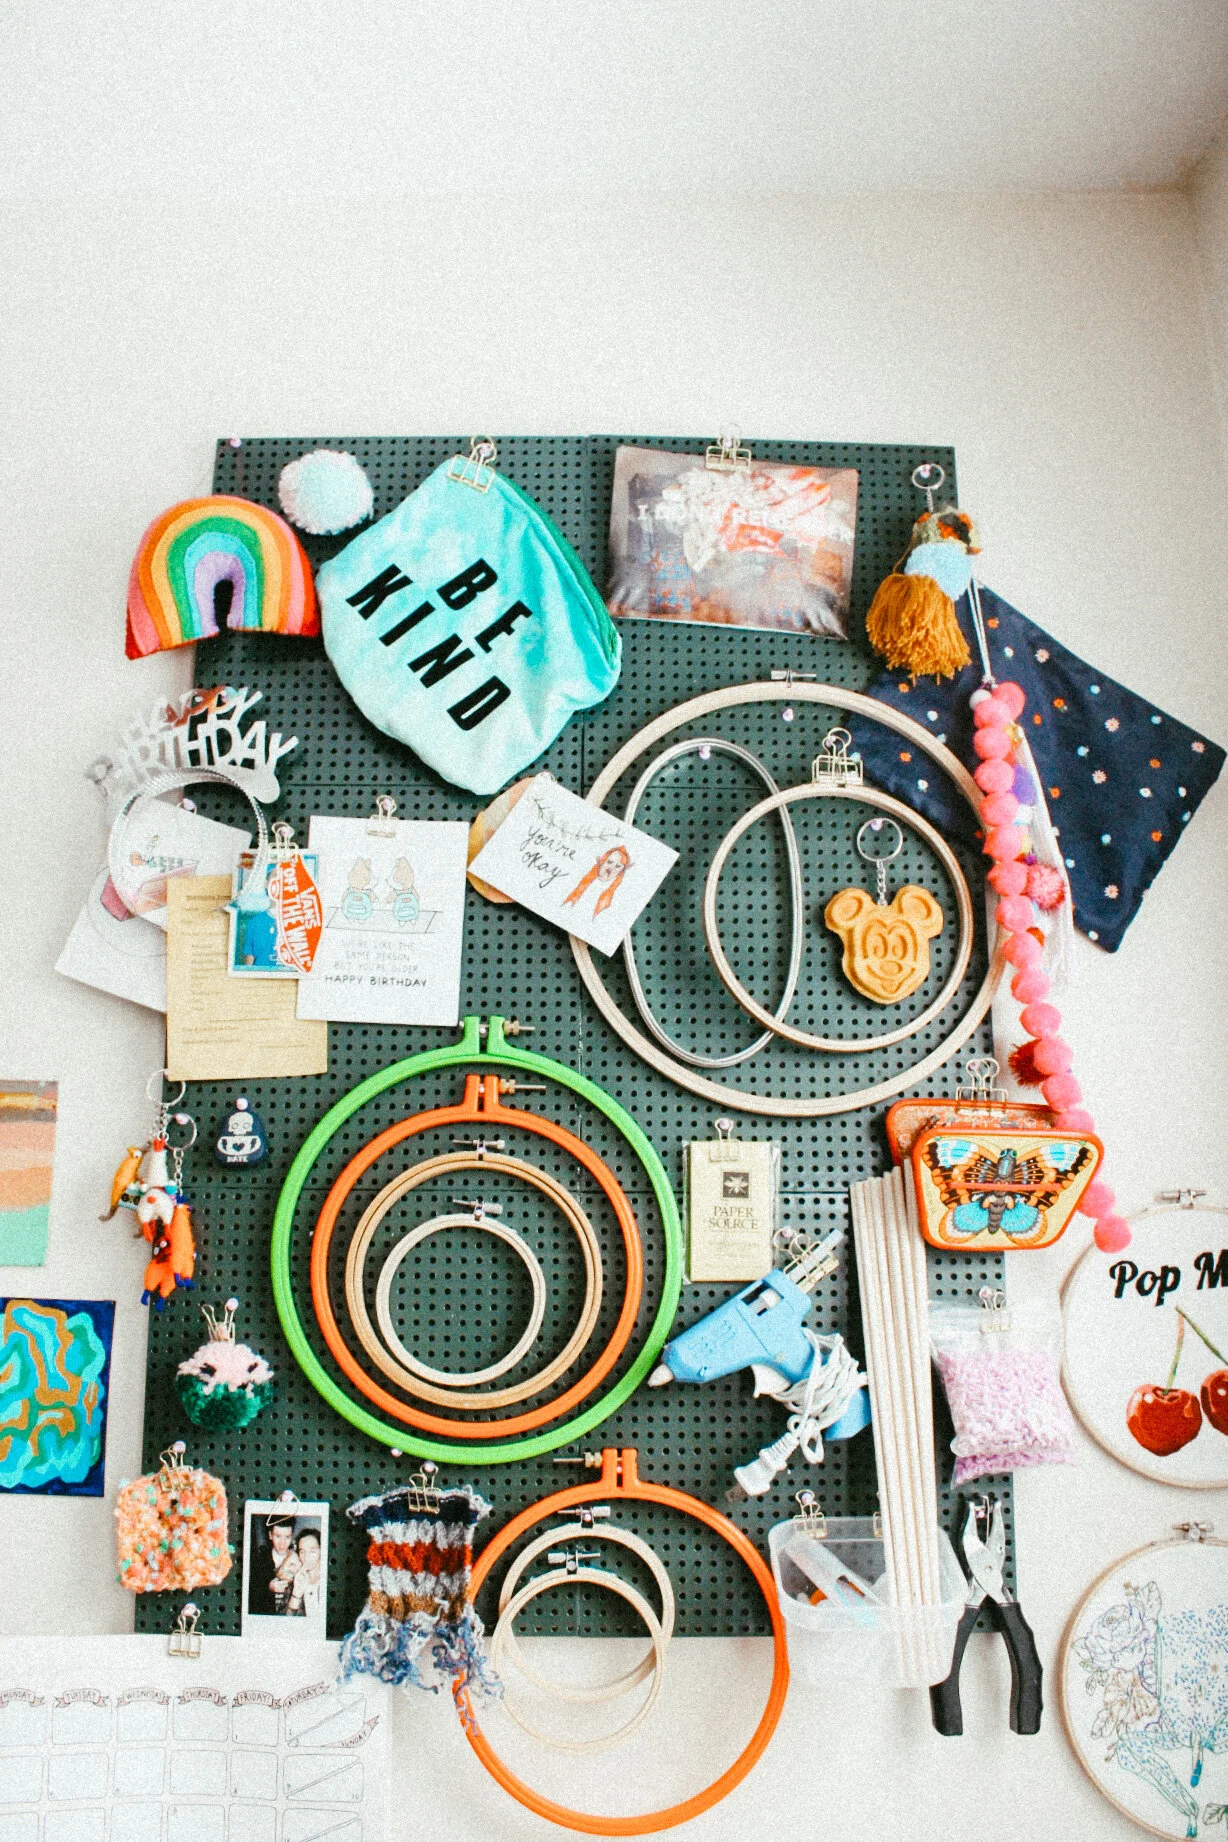
Now what I did to attach was not my proudest moment as a DIYer, but we are trying to limit the amount we go out, so I had to use the resources that I had. I had some Gorilla Wood Glue that was super sticky and like the E6000 Glue that I have used before so I painted that across the boards and then added some hot glue and attached a set of three looms together, using tape and pressing the looms into the corner of a wall so it had enough pressure. I then attached the sets of three together following the same process and let it dry for two days. It really was not my proudest moment, but it worked completely! I then added another coat of spray paint just to make sure it was all good.
Hanging it was simple, I just put 4 screws across the wall and then I nailed a few nails through the pegboard into the wall. Decorating it was my favorite part because I was able to hang up photos, supplies and some art that I had made. To hang things up in a super cool way I used these cute gold binder clips that I found on amazon. I was planning to add some more clear baskets to hold some supplies but they are not sturdy enough to stay so I just kept one to hold some hot glue sticks.
WIRE HANGING STORAGE
Based on my other inspiration, I really wanted to have some hanging shape storage. I was so into the circle but I also could not find one. I saw it on Target in the Pillowfort section but it said it was no longer available. Also the more I thought about it, the more that I felt that I wanted things to be more separated so I went with the triangle wire storage instead. It also came from the Target Pillowfort Collection, which is made for kids but is really so much more than that! I have gotten an amazing felt cat head from that section before! Anyway, the shelf was brass colored and really threw off the vibe of the storage so I decided to spray paint it black. I used the Rustoleum 2X Spray Paint in the Matte Black and it ended up looking so cool. Hanging this up was a bit of a challenge, but I also did it alone, so don’t follow my example and get a buddy to help you hang it.
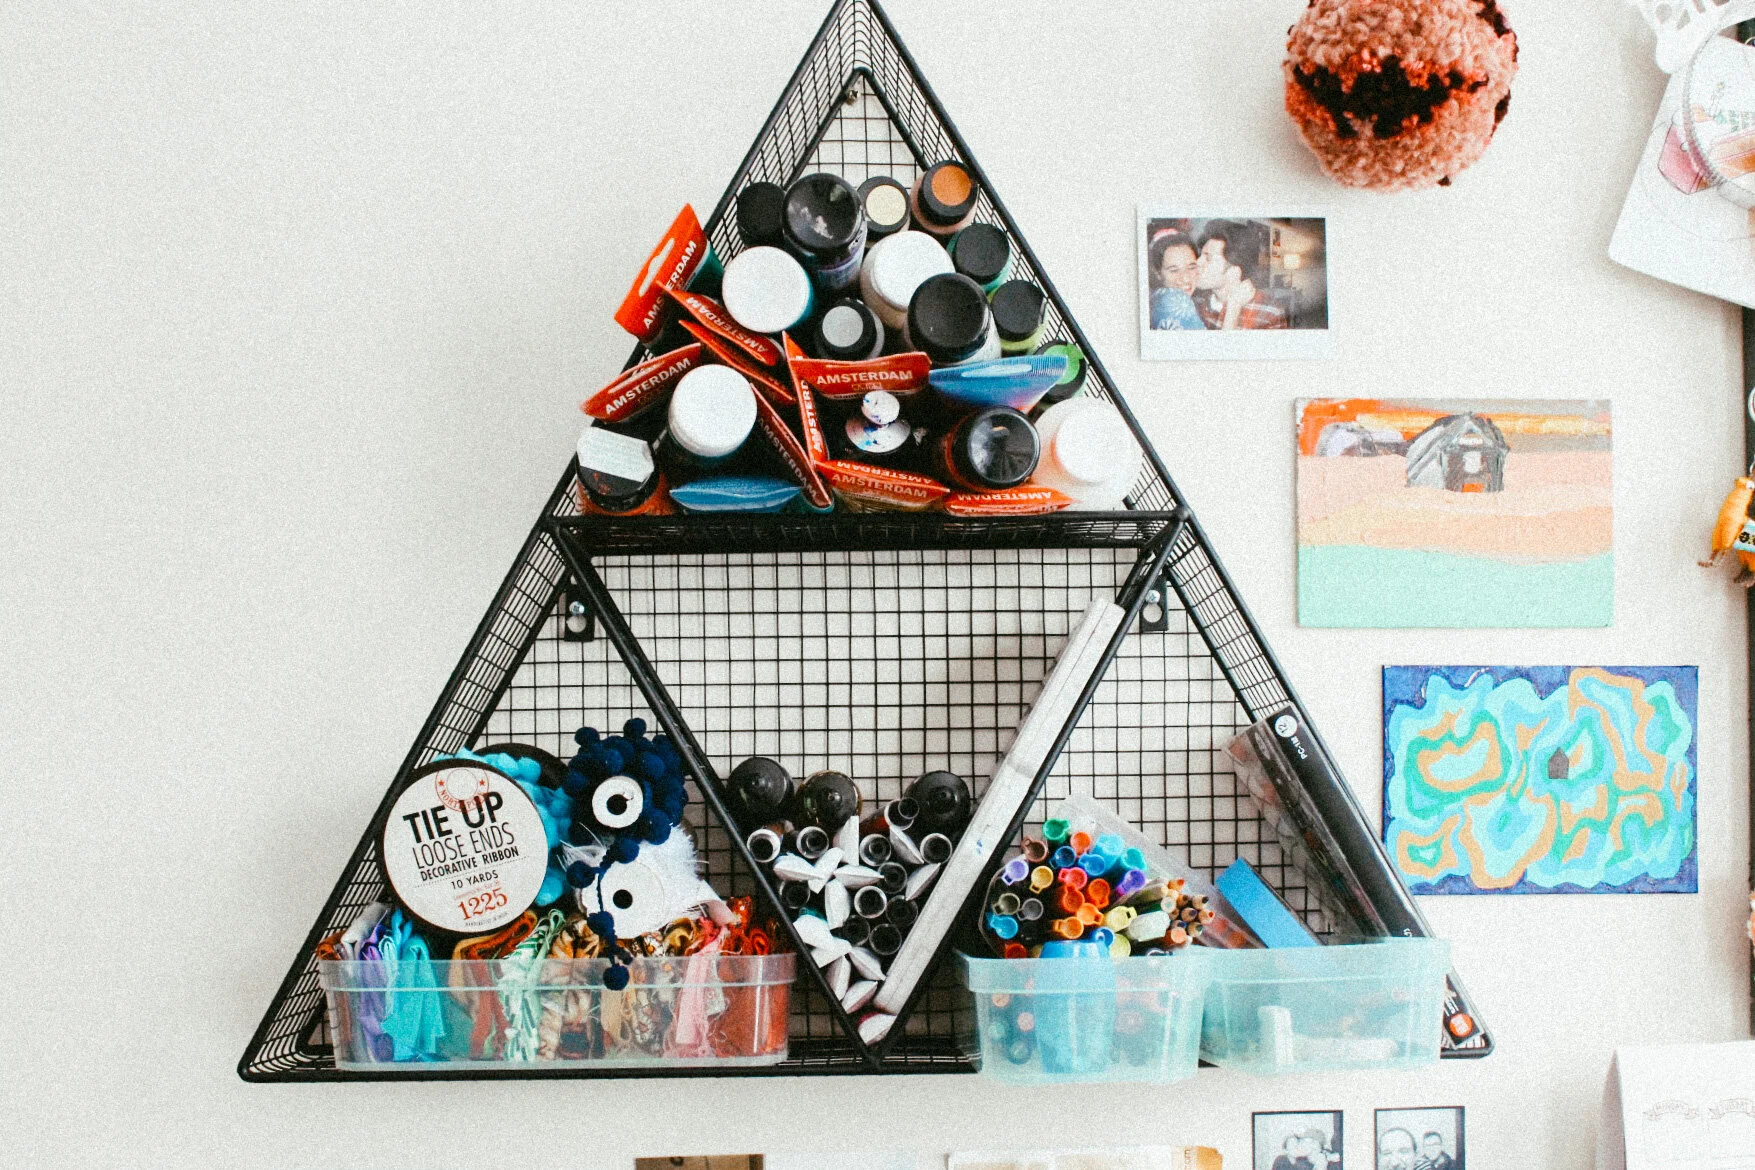
I wanted to fill it as much as possible with some scrap fabric and trim, paints and markers. For most of the supplies I used these small containers from Michael’s to help me organize, and it made it really easy to fit it into the triangle. The hardest thing was to figure out how to keep the paint containers from falling out. I honestly still do not know how they ended up staying, but I am so thrilled that it worked out because for a minute there it was raining paint tubes.
USING THE SPACE
I literally am obsessed with how this turned out and how this entire situation came to be. I ended up putting all of this on the far left wall in my dining room and getting a cool blue chair from Amazon to use at the table. Now this space has become so much more functional than just for eating. I have to say that I still do the thing where I grab yarn and go to the couch to make something, but I think that is just because of the habit/ how I have been working for so long. I am hopeful to start to use the space in this space and have things contained into this room as opposed to everywhere.

I also added something that was completely unexpected, but life changing. I have a loom from the late 70s that a teacher gave it. It is a heddle loom but can also be used just like a free standing loom. I enjoy weaving sitting up, but because all of my looms are lap looms I often end up hunched over. I got the idea to use command strips to attach the loom to the wall and I LOVE it so much. It makes for a much better weaving experience and I cannot wait to see what is to come in this space.